How to Make Mermaid Cookies

Besides unicorns, dragons, and leprechauns, another mystical creature that rates high on my list is the mermaid. From Ariel in The Little Mermaid, to the mischievous mermaids in Peter Pan, and even Daryl Hannah in the 80s movie, Splash, mermaids captured my imagination from such a young age. They are of timeless tales and I always wanted to cookie-fy a mermaid of my own.
With summer approaching, I thought now would be a perfect time to make mermaid cookies and to share the designs for you to recreate, as well!
Mermaid Cookie Cutter Plus Others
I just added three new cookie cutters to my shop: the mermaid cookie cutter, the open shell cookie cutter, and the small size variation of the tail feather birdie cookie cutter.

For this tutorial I'll be focusing on the mermaid. I wanted to create a mermaid cookie design that was both sturdy, yet flirty. I had the fins of the tail bend back towards the body to avoid creating a thin weak spot, typically where the tail meets the fins. Also, I made a large area for the hair so you could have endless body poses decorated on top of it. I'll show you two pose examples in this mermaid cookie set.
Template for the Mermaid Cookies
I'm not going to lie. These mermaid cookies can be difficult if attempted freehand. Because of the difficulty, I highly recommend using a projector for this design. I made a handy template to make the whole process much easier. In the template, I provide two different body poses for the mermaid cookies, as well as guide for the octopus and the open shell designs.
You can download the mermaid cookies template HERE.
If you have a Kopykake or Pico projector, just print it out (or pull it up on your mobile device) and you are good to go. For those without a projector, follow the suggested steps below by cutting out the template and tracing the design onto the cookie with an edible food marker.
The Decorating Process
These mermaid cookies have quite a few decorating steps, but each one goes by pretty quickly.
Disney's Ariel was my inspiration for my color palette, however feel free to choose any color you wish. For my colors you see in this tutorial, you will need the following suggested colors:
- Sugarbelle's Mermaid Green icing (Both in light and darker shades.)
- Blue thin icing (I used Americolor sky blue.)
- Flesh color icing (I mixed a tiny amount of Americolor Ivory with Copper.)
- Burnt Red icing (I mixed Americolor Electric Orange with Super Red.)
- Yellow icing (I used Americolor Egg Yellow.)
- Purple medium icing (I mixed Americolor Electric Purple with Violet.)
- Black piping icing (I used Americolor Super Black.)
- Pink piping icing (I mixed Americolor Deep Pink with a touch of Super Red.)
Step 1
Begin by applying a thin layer of blue icing to the bottom half of the cookie. I used a food-only paintbrush to add the icing, but an offset spatula would work as well. Allow this to dry (about 20 minutes).

Step 2
Once the blue icing is dry, outline and fill the tail with mermaid green icing. Then, for a whimsy effect, quickly add dots of light mermaid green icing. I learned this idea from Sweet Sugarbelle's awesome mermaid tail cookies.

Step 3
Next, with the same light mermaid green icing, add one of the tail fins. Let that set for 15 minutes, then add the other fin. Let these fins dry (about 20 minutes).

Step 4
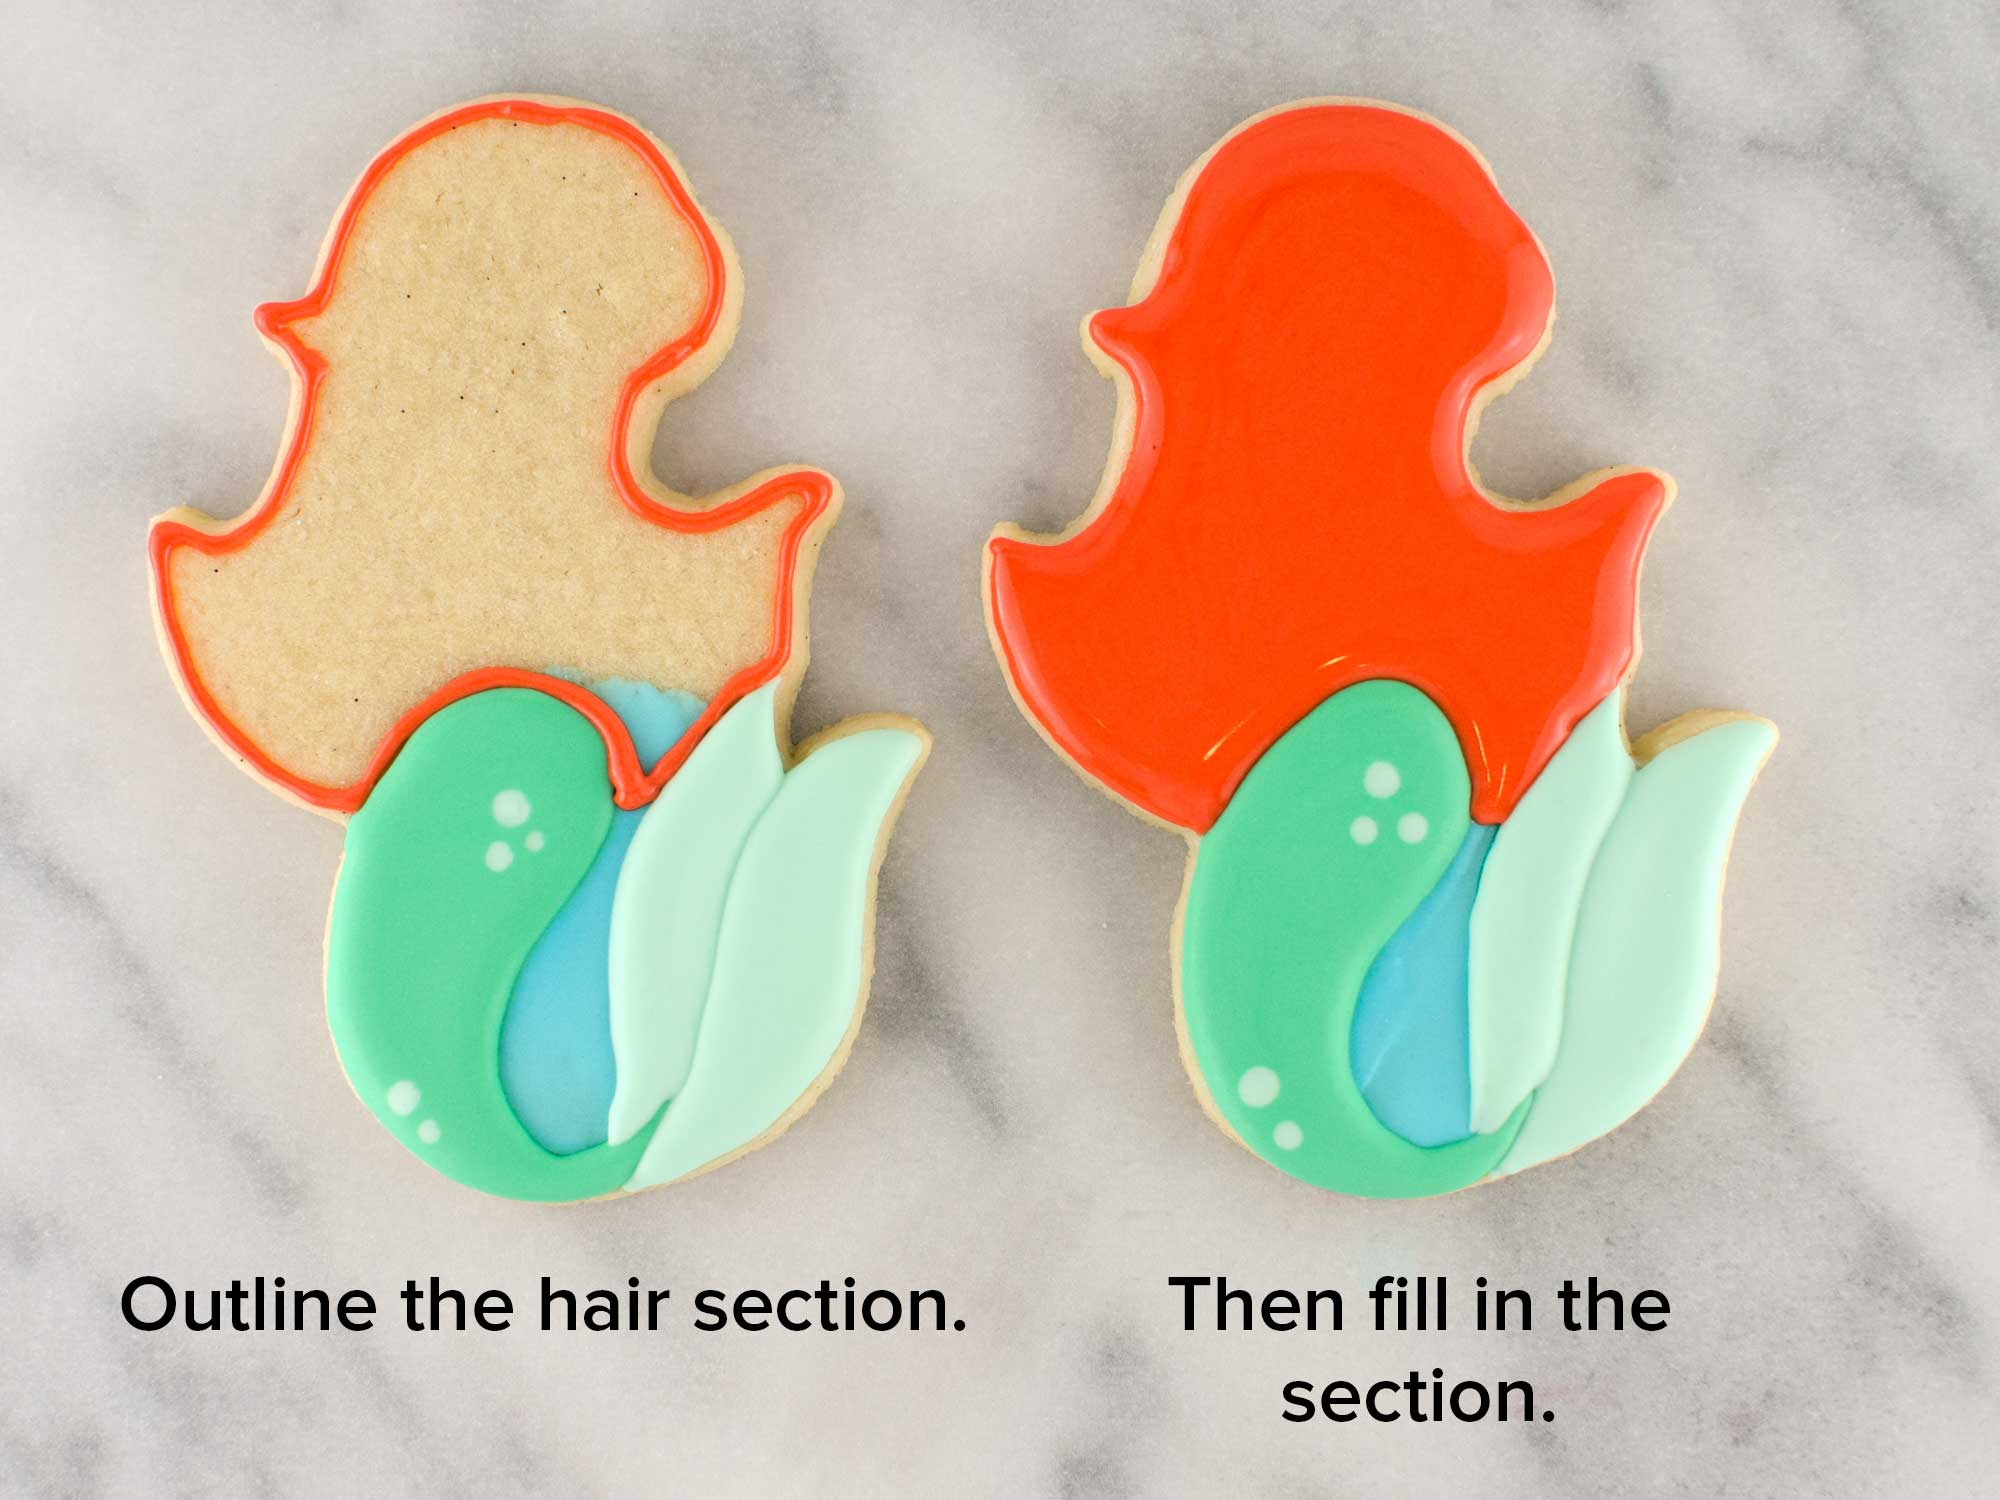
Now it's time to add the hair. With the burnt red icing, outline and flood the top half of the cookie, as shown below. Let this dry completely before moving on (about 1 to 2 hours).

Step 5
Once the cookie icing had time to dry, it's time to layer the details on top. First add the center torso with flesh color icing.
With light mermaid green icing, add the waistline fin detail then outline the fins for definition.

Step 6
Next, add the head. Try to make the chin area slightly overlap on top of the torso for dimension. Also, add the arms in the position of your choice. Let these set for about 15 minutes.

Step 7
Next, with burnt red icing, add the wave of hair bangs over the head area. Then, with flesh icing, add more piped lines for fingers.
Then, add a starfish in her hair with yellow icing. Finish off her torso with the bra detail in purple icing.

Step 8
The last step is the add the facial details. Because the lines are meant to be delicate, I used a #1 PME tip and a stiffer icing to apply the eyes and lips.

You can see, I decorated her in two different poses. One with wide arms cheerfulness, and another with flirty shoulder action. But design poses are included in the template I provided.
Video Tutorial
I summarized the steps above in this time lapse video I put together. I did have one issue while filming. I forgot to hit record at one point, so forgive me for the missing details. Lesson learned though, next time I'll make sure to check the recorder before I start piping.
To accompany the mermaid cookies in this set, I included few other Under the Sea friends to complement the theme.

The octopus was made with the same cookie cutter shape as my Love Bird cookies from a few months ago. The design of this little cephalopod cutie is by my artist friend, Steve. He graciously shared his vision with all of us and allowed me to include that design in the template for you to recreate. You can see the the rest of his talented works on his Instagram and on his Facebook page.
The open shell cookie is also a new cookie cutter available in my shop. The oyster or clam shell design can be shown housing a large pearl (like shown here) or used as a plaque housing a number or an initial.
The background ocean wave cookies were by Sweet Sugarbelle. They were super easy to put together and add a nice punch of color, completing this Under the Sea theme.

As the weather temps start to rise, I'm gearing up for a few more summer cookie ideas. But for the time being, check out these other awesome treats for more mermaid cookie ideas:
- Little Mermaid kid cookies by Cookievonster
- Simple Decorated Mermaid Tails by Lila Loa
- Mermaid cookies by Sugared Hearts Bakery
- How to Make Mermaid Cookies with a Snowman Cutter by Sweet Sugarbelle


