How to Make a Wavy Flag Cookie Set


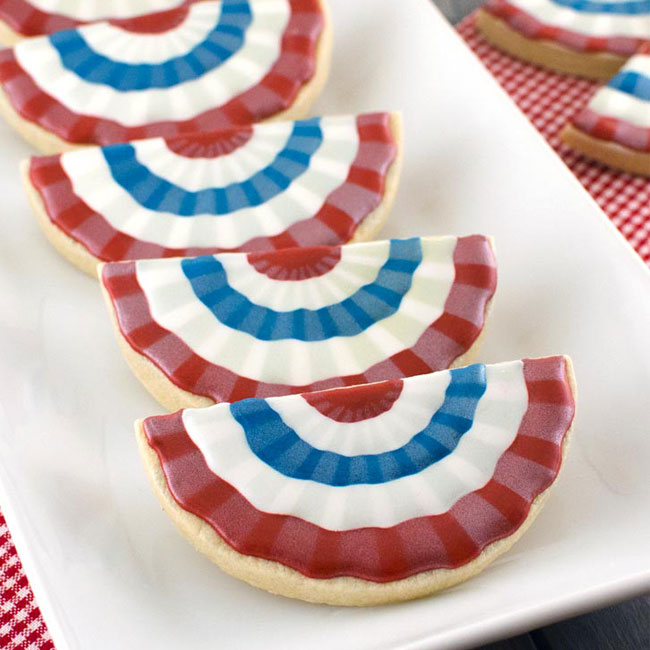
If there’s an opportunity for me to play with layers and dimension, I usually take it. Case in point, this wavy flag cookie set.
Simple and quick to decorate, this patriotic gift set is also quite easy put together. The slightly overlapping cookies give the illusion of a flag waving in the wind. I’ll go over a few suggested packaging ideas at the end of this post, but first here’s a quick tutorial of how I decorated this wavy flag cookie set for the 4th of July.
Bunting Platter Cookie Cutters
In the shop, you can find this wavy flag cookie cutter.

When assembled as an overlapping, 3-piece set, the cookies fit nicely in this 7 3/8″ x 5 1/2” box from Paper Mart.
Template for the Wavy Flag Cookie Set
All of the new 4th of July cookie designs has a template file you can download to help guide you through the decorating process.
Click the link below for the downloadable template PDF file.
The Decorating Process
To decorate this wavy flag cookie set, you will need the following suggested colors:
- Navy Blue medium icing (I used Rainbow Dust Pro-Gel Navy.)
- Red medium icing (I used Americolor Tulip Red.)
- White medium icing (I used Americolor Bright White.)
Step 1
For those without a projector, begin by making guidelines of each of the colored sections, as shown. I made a template with template plastic from the PDF file above and used a food marker to draw the guidelines on the cookie.

Step 2
For the first cookie piece, fill the top and bottom sections with navy and red icing, respectively. Let the icing dry for an hour.
Once dry, etch an outline of a star with a scribe tool or toothpick. Then fill the star and remaining section with white icing.

Step 3
Repeat the steps with the other two cookie pieces. Begin by filling in the red, then white stripe sections.
Be sure one of the cookies is flipped upside-down before flooding.

Step 4
Once dry, assemble the cookies as shown below. Place the middle cookie first, then slightly overlap the left and right cookies over the middle one.

For packaging, I always like to put my cookies in heat-sealed bags before boxing them up on paper shred. I know I don’t show them bagged in pictures. I would, but I can’t seem to avoid the glare of the clear bags when I shoot the photos.
In this particular case, I would heat-seal each of the 3 cookie pieces individually. Then I would package the cookies as shown, but use double-sided tape to keep the pieces orientated correct in the box.
The gift box I used for this wavy flag cookie set was this 7 3/8″ x 5 1/2” box from Paper Mart.